A Practical Introduction To Corset Training

This article explains how to start corset training (also known as tight-lacing or waist training) by introducing your body to the pressure gradually, so it can adjust properly and also so that your training corset can mold to your body shape. Without this ‘breaking in’ period, you are more likely to experience discomfort and quit, and your waist training corset will be more likely to sustain stress damage.
What Makes a Good Waist Training Corset?
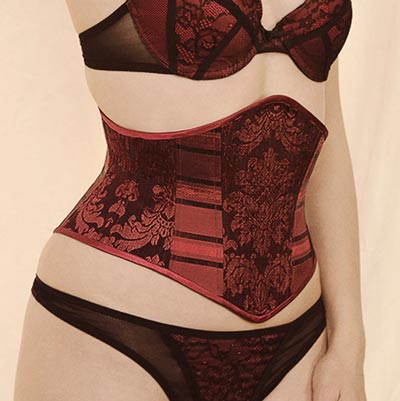
Historic Waist Training Corset
There are as many opinions on this as there are people waist training, my opinion alone has radically changed over the years. When I started corset making and experimenting with corset training, I believed cotton coutil was the only lining fabric you could use to make a proper waist training corset and that you needed at least two layers and a waist tape. I didn’t understand why there were people experimenting with cotton canvas/cotton duck and other stiff fabrics when coutil was specifically designed for corsetry.
My opinion on fabric and the number of layers you need for waist reduction changed for good when I started collecting historic corsets. The tiny waists achieved in the Victorian and Edwardian era were done so with corsets like the one pictured to the right, where a single layer of cotton was used with only some areas doubled up to sandwich the bones. My opinion on waist tapes was blown out of the water when I started to study corset makers and one of my favourites stated in a Facebook group that he hadn’t used waist tapes for years (possibly the whole of his career, I struggle to remember his exact words) and that he’d never had problems with customers experiencing split seams. Indeed his corsets are beautifully smooth as the ridge sometimes caused at the edges of the waist tape aren’t an issue for him.
Now having said all this, if you go out and buy a flimsy corset with no waist tape and expect it to last, you’re going to be very disappointed. I can imagine the Victorians got through a lot more of them than the modern day tight-lacer, and a corset without a waist tape should have a decent amount of strength to it to accommodate for the added pressure at the waist. There are also other things to consider while selecting your training corset, such as bone placement and probably the most important factor of all in finding a good corset – shape and fit.
Shape
It seems as unnecessary as writing down instruction on how to suck eggs, but so many would-be corset trainers need to be told that a waist training corset needs to have an hourglass shape to give you an hourglass shape. *sigh* If you’re reading this and you’ve already ‘waisted’ money on a cheap corset off of eBay or one of those ready-to-wear discount websites then you’ll know what I mean… or you’re still trying to work out why your ribs ache, there’s a roll of flesh surrounding the bottom edge of your corset, and if you should feel this uncomfortable while corset training? Plus you’re probably not achieving the waist reduction you should be. Perhaps I’m being a little extreme but these are all signs of a badly fitting, badly shaped corset.
It’s easy to end up with one of these ill fitting corsets, many experienced tight-lacers have one buried at the back of their wardrobes, myself included until a spring clean saw it charity shopped a few years ago. The problem is not knowing what to look for when you start out. You see ‘corset training quality’, ‘triple layer’, ‘coutil’, ‘steel bones’, and those are all great ingredients for a sturdy corset training corset, but the newbie then forgets to study the shape and check that their own hip and underbust measurements match those of the corset. There are a lot more measurements to consider (including length of torso) but if the general shape doesn’t have that corseted hourglass silhouette we see on fine examples of custom corsetry, then they won’t magically materialise once you put the corset on.
So what do you do as a fledgling waist trainer? That’s easy, you study! Study all the custom corsets you can find; I call this digital window shopping. Check out the waist size in relation to the width at the top and bottom of the corset, study the compression of the ribs on different corsets, how much room do you want around your ribs, count the panels that make up the corset (the more panels, the more curved the shaping). You’ll soon start noticing the difference between a generic/badly formed off the peg corset and a proper hourglass waist training corset. Here’s an extreme example of the difference to start you off –
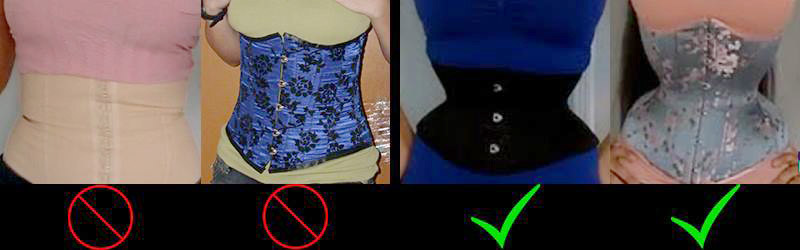
Photo from the Corset Training Facebook Group
This image is the background photo for the Corset Training Facebook Group, for which I’m one of the admins.
Fabric Quality & Layers
As I said above, you don’t need to have two or three layers of coutil and a waist tape that would take your whole family’s body weight if you were using it to climb out of a burning building. The Victorians got away with single layers of cotton and they achieved some of the smallest waists in history. But if you want a good, strong corset that will last, won’t stretch over time and you won’t find the bones wearing through after six months of wear; go with a coutil lining, an outer layer of medium weight fabric; and a waist tape, preferably of petersham ribbon.
Experimenting with single layer corsets, mesh corsets, and those without waist tapes while corset training is something to leave for when you’re more experienced (or win the lottery). You want to invest in one or two decent training corsets to start off with and I highly recommend having them custom made to your measurements. I’m currently experimenting with constructing single layer corsets, the one at the top of this page is a single layer of upholstery fabric with no waist tape and probably wouldn’t provide enough support for a serious tight-lacer. It’s really comfortable and you could waist train in it, but it has some give in the fabric and would probably stretch before too long.
Hardware
So we’ve covered shape, you need a curvy corset with multiple panels (five is the absolute minimum) and we’ve talked about fabric and support – coutil lining, layers and waist tapes. But without quality hardware your new favourite wardrobe staple won’t survive past its first few weeks of wear.
This is more a warning for those making their own corsets, if you’re having one custom made or buying from any decent corset maker then they’ll be using steel bones and decent eyelets. If you’re making a corset for yourself, then please don’t use industrial cable ties as bones or any form of plastic boning for waist training. If it’s costume or occasional wear or an evening dress then go ahead, but if you’re lacing down in it day after day, invest in steel bones. They are more comfortable, I promise! Plastic bones will develop weak points when you bend over or sit down, they then remain kinked when you stand back up and over time will break. It only takes one wearing to develop unsightly bumps and kinks in plastic bones. I can’t talk for cable ties, I’ve not used them myself, but spiral or sprung steel bones are superior and provide more support, they are not uncomfortable as some people seem to believe. It’s also very important to have flat steel bones either side of your eyelets to keep them from popping out and eyelets (also called grommets) that have a washer. Washers are circles of metal that go on the back of your eyelet, so you’re effectively using two-piece eyelets with a back and front rather than those one-piece eyelets that aren’t as strong. I have used both and wouldn’t like to use the latter for corset training, they’re more likely to pop out and your laces can catch and fray on the jagged edge you get on the back of the eyelet.

How To Start Corset Training The Right Way
When you start wearing your corset for the first time, you need to begin slowly with only a few hours of wear a day; this is called ‘seasoning your corset’ or breaking in. This gives your corset a chance to adapt to your body, and your body time to adjust to the form and restriction of the corset. If you were to lace up for ten hours straight away, for example, you might experience cramps in your back, (especially if you’re not used to sitting up straight!) or a feeling of strong discomfort and an urge to take the corset off. This can lead to you associating your corset with discomfort and will make you less likely to put it on again the next day. Waist reduction is not a quick process, you need to be in it for the long run, so don’t put yourself off for the sake of a week or two of gradual build up. That aside, it’s not good for your corset either; corsets are designed not to stretch but all material gives a little, a breaking in period will allow it to slowly adapt to your unique body shape, stretching slightly where the pressure is greatest. This gives a better fit and a more equal pressure overall, which in turn extends the life of the garment and helps prevent popped eyelets or ripped seams occurring.
Lecture over! Let’s look at how it’s done – The first time you lace up, pick a day you can stay at home for a few hours. Put your corset on and pull the laces so it becomes snug, like a gentle hug. Stretch and wriggle about so it feels like it’s sitting in the right position on your body. Check the busk and lacing gap are straight and that both sit in the center of the body, before pulling the laces tighter so it feels like a strong hug – you should still be able to breathe freely and feel comfortable. Spend 30 minutes moving about until the corset starts to feel looser and tighten again in the same way. Continue to wear for up to 2 hours, tightening every half hour or so only if your corset starts to feel loose – it won’t actually loosen at the laces but the fabric may stretch and relax slightly if you’re breaking it in (see seasoning below) and as your body gets used to the restriction, you’ll start to feel like you’ve got excess wiggle room and can comfortably tighten it a bit more. Stick to a 2 inch reduction or below and listen to your body, if you start to feel uncomfortable then loosen your laces or take it off. During the next few weeks you can slowly move up from 2 hours to 12 or more, going up by no more than an hour each day.
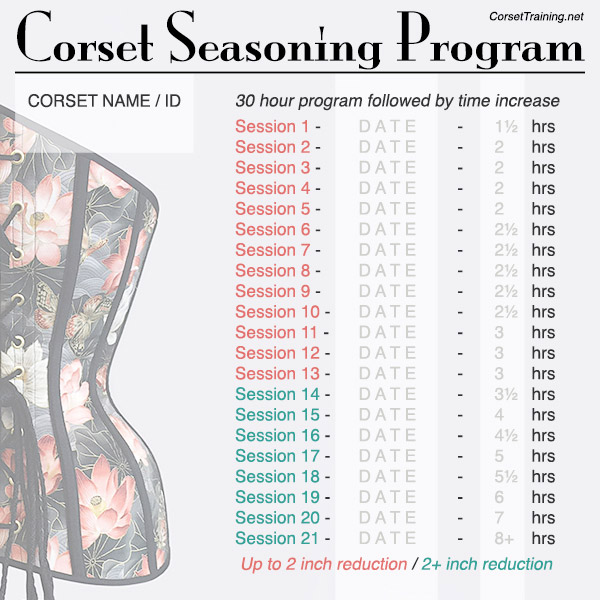
Seasoning A New Corset
Below is a log for corset seasoning that you can use. I’m often asked about corset seasoning, which is the process of breaking in your corset slowly so that it molds to your body. This prevents seam ripping and allows your body to get comfortable in the corset before you wear it for prolonged periods of time. Timing varies depending on who you talk to, but 2 weeks (or 30 hours if you’re not seasoning every day) of wearing at around a 2 inch waist reduction (from your normal waist size) for a few hours a day before slowly increasing the wear time and reduction is generally accepted as the norm.
If you’re a regular corset wearer or you make corsets for tight lacers, then you’ll find the below log for corset seasoning very useful. There’s a ‘corset name/ID’ space so you can give your corset a nickname if you happen to be seasoning more than one corset at a time, a ‘date’ section so you can record the date and/or time of each seasoning session, and suggested hours for each session which can be written over if your time in the corset varies.
Save the image and print it whenever you need to season a new corset, feel free to share and post wherever you like as it’s a completely free resource!
Continued Corset Training, How Fast And How Small?
Once you’ve broken in your waist training corset and you’re happily wearing it every day, it’s safe to train for up to 23 hours a day – take it off to exercise and shower obviously! Remember to ease your body into it again every morning if you don’t sleep in your corset, or wear it looser at night (a lot of tight-lacers use their old corset to sleep in once they reduce down so far they need a new one). You definitely don’t have to sleep in your corset! Put your corset back on in the morning and gently tighten a bit at a time as you did while seasoning but much quicker. By the time you’ve done your hair and make up, had breakfast and cleaned your teeth, you should be good to go.
Again always listen to your body! That’s the number one rule. Your body will naturally take a larger reduction as time goes by. Expect to lose 2-3 inches immediately and a further 1-2 within a few week/months. It varies considerably depending on your body type; a lean physique will take longer as it won’t squish as much as a fuller figure, if you’re petite and have a tiny waist to begin with, you won’t be able to reduce as much as your friend who’s a foot taller than you and had a naturally bigger waist to begin with. If you’re combining corset training with dieting this will obviously be greater. Use common sense and don’t become blinkered by the tape measure.
The smaller you go, the longer it will take to achieve the next inch. Always put your health before your vanity and consult your doctor at the first sign of trouble or pain. You should have regular checkups when reducing down very small, say over six inches smaller than the normal waist size for your age (if you are the correct weight for your age and height). Also make sure to add an exercise regime of some sort to your lifestyle if you haven’t go one already, I can’t stress the importance of core muscle strengthening. For more information check out this article – Diet And Exercise While Corset Training.
The ‘Corset Diet’ – Waist Training For Weight Loss
I get a lot of questions about corset training and weight loss; does wearing a corset help with dieting? How fast can I lose weight? What size corset should I get if I plan to lose a certain amount of weight?
Firstly, a corset diet is not the miracle cure to stop weight gain, yes I know it would be nice if it were. Certainly it’s harder to put weight on if you’re lacing down four inches smaller than your natural waist, but not impossible. If you eat nothing but snack food and junk, then a corseted diet won’t help you lose any of the weight you have (it’ll just make you look fabulous while you binge, but fabulous doesn’t translate to our friend the bathroom scales).
What corset training will do is make you feel fuller after smaller meals, it’s like a gastric band but much prettier! If you plan healthier meals in smaller portions and exercise as well, then you’ll find it much easier to lose weight with a corset. What you mustn’t do is graze all day. Tight lacers will often have four or five small meals a day depending on how small they’re lacing down. If you’re just starting out and waist training for weight loss, then stick to the regular 3 meals with an occasional healthy snack. How fast you lose weight will be entirely down to you, your size, your diet, and your exercise plan – and you will need to exercise regularly whether you’re dieting or not, as wearing a corset weakens your core muscles. For more information about eating and exercise while tight-lacing check out this article – Diet And Exercise While Corset Training.
As for corset size, go as small as you can, or try to start losing weight before getting your corset as, if all goes to plan, you may need to get a smaller one much faster than a regular tight lacer would. I don’t suggest a lacing gap of more than 5 inches, but again it depends on your size; you need to be able to get into the corset without it being uncomfortably tight and you will still need to go through the seasoning process outlined above.
Further Reading
So that’s my two cents (plus change) on how to start corset training correctly. If you want to read more, the Articles Hub is here. If you need further advice and guidance on seasoning, I suggest checking out Lucy’s Corset Seasoning Mini Series.