How To Make A Corset, Getting To Know Your Corset Making Tools & Materials
When you’re just getting into corset making it can all seem a bit specialized. You’re not really sure what’s involved, what tools you’ll need or what materials to use. Well let’s make it all a little less scary by familiarizing you with these special corsetry tools, they don’t bite (promise) and they’re not that hard to use either. Now there are some similarities to be found between routine dressmaking and the craft of corsetry, however there are a variety of devices that you won’t discover in a dressmaker’s sewing box that you’re going to need in order to make a corset. Below I’ve written a beginners rundown of what’s needed to make a real steel boned corset, the kind used for corset training. FYI for other articles on making corsets, feel free to browse my How To Make Corsets page.
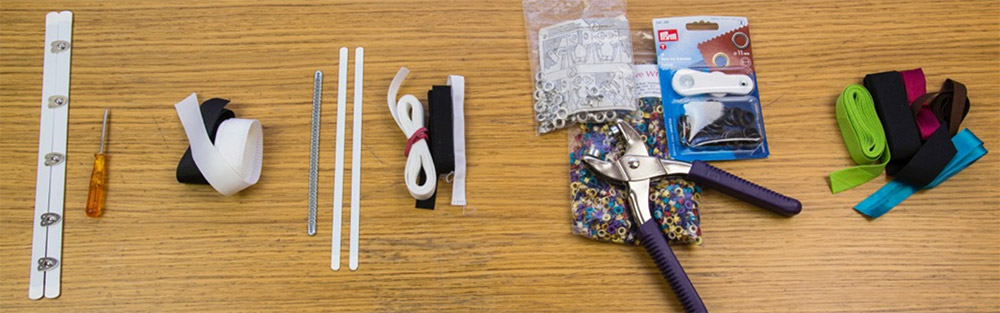
Left to Right: Front Closure or ‘Busk’, Awl, Waist Tape, Steel Bones (‘spiral’ and ‘flat sprung’ steels), Bone Casing, Eyelets and Eyelet Setting Tool, Bias Binding.
The Busk
The corset busk is optional as you can have a corset pattern with lacing at both the front and back, there are even corset patterns with closed fronts. However the majority of corsets are designed to open at the front with a busk. They’re made of two strips of sprung steel boning, one with loops attached, one with metal knobs and they’re sewn into the front two panels of the corset design. To close the corset you simply hook the loops over the knobs.
The Awl
Awl is just a fancy name for a pointy stick when it comes down to it. The awl will normally be made from metal and it fits in the hand like a pencil with a fairly blunt point at one end. You use it to make holes in textiles without ripping or tearing any of the textile threads. When making a corset you work the point into the material where you want the knobs on your busk to poke through (the busk is that front closure you see on corsets with the loops one side and the knobs the other) and the awl parts the strands in the material, leaving a hole that will not grow or fray with wear as a hole does when you cut into fabric. A metal kebab skewer will work just fine if you’re on a budget.
Waist Tape
Not always necessary in a corset, this cotton tape can be petersham ribbon or twill tape (or any other non stretch tape for that matter). It’s placed in the corset at the waist, considered the thinnest part of the corset. It stops the waist area stretching and provides added support to the area of the corset under most stress. Basically you’re less likely to rip a seam open when you sneeze.
Steel Corset Boning
This comes in two kinds – sprung steel and spiral steel boning – the sprung variety is your regular kind, made of solid strips of steel that spring back into shape if bent. So if you flex one, then let it go, it springs back to its original position. These bones are coated in a white plastic to make them water proof. Spiral boning is made up of two continuous steel wires which are coiled together then pressed flat into strips of spiral steel the same size and shape as the sprung steel bones. They have capped ends to cover the cut wire. These are a lot more bendy than sprung steel and will bend sideways too – just something to keep in mind when you start corset designing.
Bone casing
Bone casing is simply a length of cotton tube that you sew into a corset to hold the boning in place. You cut it to the length you want, pin it in place and sew down both sides keeping as close to the edges as possible so there’s still room in the middle to slide your corset bone in.
Eyelet Setting Tool & Eyelets
This is another hand held tool, it squashes the eyelet into place between its two metal plates (eyelets are the little metal pieces with holes in that you push your laces through in the back of the corset). You can purchase eyelet kits in sewing shops or online, these consist of a bag of eyelets (sometimes with washers, sometimes without) and two loose metal plates that you place either side of the eyelet and tap with a hammer. These are a cheaper option then buying the hand tool if you only mean to make one corset, but a lot of extra work. If you’re taking the plunge into corset making then invest in the hand tool.
So those are the primary materials and tools used exclusively in corsetry. I’ve only briefly covered them but the above descriptions should serve well as a gentle introduction to how to make a corset and exactly what’s involved equipment wise! See, nothing scary at all.
Bias Binding
You may already have used bias binding in your everyday sewing. It’s a length of cotton cut on the bias with its edges folded in and pressed. It’s used to finish off the edges of corsets. You can become an instant pro at attaching it to your corset edges by reading my tutorial – How To Sew Perfect Professional Level Bias Binding.
Where To Get Your Corset Making Supplies
There are lots of places online to get the various corset making tools and supplies mentioned above. Check out my downloadable corset belt pattern and booklet for a list of my favourites. Let me know if you find any more and I’ll add them!
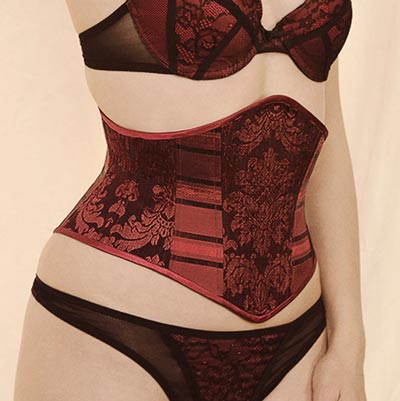
What Types Of Fabric Can You Use For Corset Making?
The fabric element of a corset requires two layers; an outer ‘fashion fabric’ layer (preferably of something thick and stretch proof but ultimately its purpose is to look good) and a structural lining of coutil. Coutil is a thick cotton with a herringbone weave. It is designed not to stretch, which allows for the tight lacing of the corset without it stretching.

Left: Ordinarily brocades & heavyweight fabrics make good outer fabrics for corsets. Try upholstery fabrics if you get stuck (fabrics used to make curtains and cushions). Right: Herringbone coutils in typical colours – black, white and beige/skin color.
Learn How To Make A Corset With My Free Corset Pattern
I have a great little easy and free corset pattern that comes with a list of online corsetry suppliers and a walk through corset making tutorial. It’s a free PDF that drops into your inbox instantly and prints off on your home printer. You can have your first corset pattern in your hands in 5 minutes time!
This is a great little pattern, I’ve designed it to be reversible so you can wear it with the laces at the front or back. It’s the perfect starter corset if you’ve not made a corset before and the perfect weekend project if you’re a bit more advanced. I’ve seen some super corset belts made up from this pattern already in some gorgeous fabrics. One first time corset maker even made one from a beautiful silk to go with her kimonos. It’s perfect to wear over dresses, with jeans or, you know, with that vintage kimono you have laying around 😀
How To Make A Corset, Scaling up Corset Patterns
The very last thing I think I should tell you about in order to get you started with your corset pattern is called ‘scaling up’. If you’re working from a book or a scaled down drawing, you’re going to need to copy it out at full size (unless you’re making dolls’ clothes) ? In other words, you’ll need to copy it out bigger onto pattern paper. So you’ll also need to check there is a scale on the pattern, i.e. 1 cm equals 20 cms. Better still is a pattern with a scale and a grid – then you can get some squared or ‘cross and dot’ pattern paper to scale up your pattern pieces onto. You can see the process in my article How To Scale Up Corset Patterns From A Book: Time Lapse Video. If you can find a corset pattern that will print out at full size this would be ideal but you’ll need to stick pieces of paper together if you’re printing on a standard A4 printer. You can obviously avoid the hassle altogether by buying physical patterns. A number of the suppliers listed in my article Corset Making Suppliers stock physical patterns so have a shop around and check out a few before choosing one.
What You Should Know About Using Free Corset Patterns
There are many types of corset patterns and corset making tutorials around, some free and some fairly sensibly priced. I know when I was starting out I would give anything a go, I had a few nasty/frustrating experiences so I want to spare you the upset of putting a lot of effort into a project that quickly becomes a bit of a nightmare and potentially puts you off corsetry. It’s also why I made my free corset belt pattern which you can grab at the bottom of this page.
So the free patterns out there, although very attractive as they don’t cost you a penny, are quite often incomplete, bad quality or come with incomplete or incoherently written guidelines. Especially if they’re vintage. Below are some pointers for picking out the decent free corset patterns!
- So this is going to sound silly/obvious, however it really happens, and people get to the pattern cutting stage before realizing; are all the pieces there? If the pattern is incomplete or badly labeled, you may wind up spending your money and time on fabric and supplies, only to discover your stunning newly-sewn corset design is totally the wrong size and shape! Pattern pieces that haven’t been labeled properly are typically next to impossible to match up correctly and in the right order/orientation. If you suspect pattern pieces are missing and there are no labels, it can be hard to work out if everything is there or not. If you’re not sure but really want to make that particular corset pattern then make yourself a quick mock up to check (something you ought to be doing anyway when using a new corset pattern).
- Secondly, look at the curves and lines of the pattern, gauge the bust, waist and hips to get an idea of whether the waist is small enough in relation to the rest of the torso to give the wearer adequate curves – very important if you’re making corset training corsets. If the waist isn’t small enough then it’ll be a very ‘straight up, straight down’ corset design with no dramatic curves and (unless it’s an Elizabethan corset or a men’s corset) this is a sign of bad corset drafting or at the very least a fashion pattern not designed to give a proper corseted waist.
- How many pattern pieces does it have? A corset pattern is usually made up of half a corset, you cut out half, then flip the pieces to cut out the second half. The more pieces it has the better it will curve round the body and the less wrinkles you’ll get. As a general rule you should expect at least 5 pattern pieces per side, four isn’t great unless you’re going for a gentle waist reduction rather than that breathtaking tiny waist associated with a proper corset. If it’s a costume no problem, but for tight lacing you’ll want more.
- So you think you’ve discovered yourself a cracking little pattern based on the above advice. You think all the pieces are present and the design looks good, now what? Well now if you have no prior experience in corset making and this is your fist time trying to make a corset, you’re going to need comprehensive instructions, so does your pattern have any? It can be hard to find a free corset pattern with detailed instructions so you’re most likely going to require some additional corsetry literature that, yes, you’ll probably have to pay for. Typical right? Typical however essential as you won’t get far without a decent guide or book on corsetry. A number of books out there will likewise have their own patterns, yet another reason that free patterns turn out to be a false economy. If however you do know how to make a corset, then a cost-free pattern is a genuine cash saver.