Today I’ve been cording some silk fabric. ‘You’ve been what-ing your fabric?’ I hear you ask…
Well read on and I’ll show you both the what & the how!

Cording Example
But 1st a quick question – Do You Want To Make Your Own Corsets ???
My Beginners Video Guide & Sewing Pattern!
Make as many corsets as you like for a one off
- Complete walk through video
- Bonus video – Professional fit & finish
- Corset Making Manual – Detailed corsetry techniques
- The Scarlett Printable, Multi-sized, Pattern
- INSTANT DOWNLOAD!
- MONEY BACK IF YOU DON’T LIKE IT GUARANTEED ?
Now On To Cording, So What Is It?
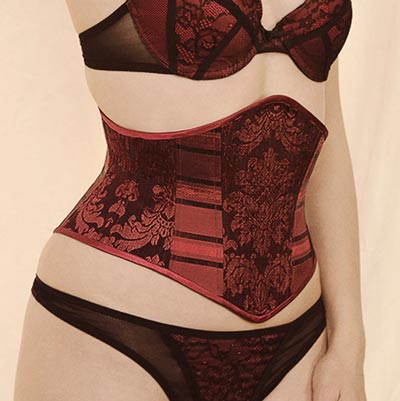
Cording was used extensively in very early corsets to add strength and structure to fabric. Both very important in corsetry.
It also looks pretty awesome!
Cording just involves putting two fabrics together and sewing rows and rows of lines, between which are rows and rows of cord sandwiched between the two fabrics.
So if you’re into making historical corsets you’re likely to need to cord some pattern pieces at some point. If you’re more into modern corsets then adding cording can make a plain corset look more exotic, add a second texture and give extra support to a delicate fabric.
‘So how is it done?’ Well I’m glad you asked, below is my step by step with pictures 🙂
PRO TIP: When you use cording in a corset pattern it has to be done before the cutting out of the pieces as the process will make your fabric narrower.
Have You Grabbed Your FREE Corset Belt Pattern?
Grab the FREE Reversible Corset Belt Sewing Pattern, instant download.
No charge 😉
How To Cord Your Fabric
- You start by taking your piece of outer fabric and some backing fabric. Backing fabric is often something strong and stretch free.
- Lay your outer fabric on top of the backing fabric, right sides out.
- Now sew a straight line near one edge sewing the two fabrics together.
- Next you open them up and place a length of piping cord between them, right up against the line of sewing. (Below)

- Then flip the outer fabric back down sandwiching the cording between the two fabrics. (Below)

- Then using a zipper foot, you sew another line of stitching the other side of the piping cord to enclose it. (Below)
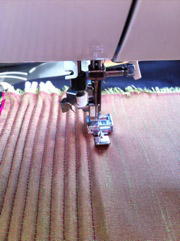
- Repeat this with more piping cord again and again until you reach the other edge of the fabric. That’s it!
Here is my corded section of fabric to give you a better idea of what to do:
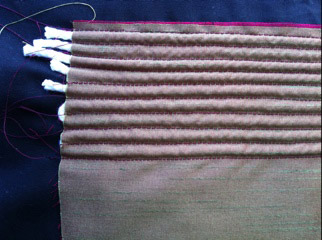
You can either cut each bit of cord (first 4 rows above) or you can use one continuous length of cording and snake it back and forth as you sew each row (last 4 rows above).
Sew Yourself Stunning! (Curves That Count At A Price That Doesn’t)
Course + Pattern Pack
Great For Corset Lovers
- Complete walk through video
- Bonus video – Professional fit & finish
- Corset Making Manual – detailed corsetry techniques
- The Scarlett Printable, Multi-sized, Pattern
- The Lotus Printable, Multi-sized, Pattern
- The Cupid Printable, Multi-sized, Pattern
- The Angel Printable, Multi-sized, Pattern
Course + Scarlett Pattern
Great For Beginners- Complete walk through video
- Bonus video – Professional fit & finish
- Corset Making Manual – detailed corsetry techniques
- The Scarlett Printable, Multi-sized, Pattern
- The Lotus Printable, Multi-sized, Pattern
- The Cupid Printable, Multi-sized, Pattern
- The Angel Printable, Multi-sized, Pattern
Just The Patterns
Great For Established Corset Makers
- Complete walk through video
- Bonus video – Professional fit & finish
- Corset Making Manual – detailed corsetry techniques
- The Scarlett Printable, Multi-sized, Pattern
- The Lotus Printable, Multi-sized, Pattern
- The Cupid Printable, Multi-sized, Pattern
- The Angel Printable, Multi-sized, Pattern

Thank you for sharing this! I’m interested in making a sunbonnet using cording but hadn’t known exactly how. Now, I’m a bit more confident!
I made a corset with some black satin which I had corded first – made it follow the body shaping; more than worth the effort !!! I would say to everyone try it at least once