As promised yesterday, here’s an update on what I’ve been sewing over the last few weeks.
As you may know I’m attempting to get three corset patterns ready to launch for Valentines Day. Whether I’ll manage it remains to be seen! I’ve had some issues finding a professional pattern grader I’m happy with and there have been some teething problems and a few false starts. One announced after taking on the project that actually there wasn’t enough time to complete them! Anyhoo, yesterday I posted some photos of the dusty pink suspender corset which is pattern one. For corset pattern two I chose these maroon fabrics hoping they’ll go with the vintage theme I have planned for the photoshoot next week.

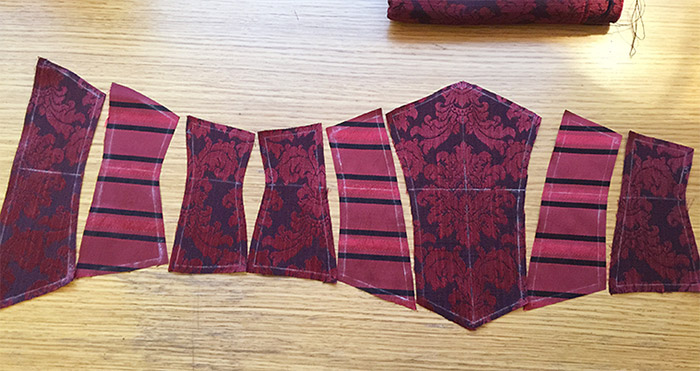
Fabric choices for the cincher corset pattern
Here’s the pattern pieces and as you can see it’s a waspie/waist cincher style corset. I wanted to have patterns that catered to all sewing levels in the set, so this would be beginner level difficulty and the suspender corset is more of an intermediate level. Yes the last will be an advanced pattern but more on that in a bit!

Pattern pieces
I’ve been experimenting with ‘heat n bond’ fusible interfacing recently and I’ve found it gives a nice smooth, stiff (no sniggering) appearance, especially if you ‘roll iron’ it on, which is what I’m doing here. I’ll go into detail about fusibles in a later blog post once I’ve had time to wear-in some fused corsets and see if the horror stories about puckering and wrinkling are true – mixed opinions on fusing in the corset making community. You can also see perfectly in this photo where Layla’s spot is and just how in the way she likes to be. I can’t be sure but I suspect the person who coined the phrase ‘getting under ones feet’ had a Fox Terrier.

‘Roll ironing’ while Layla snoozes
Here you can see how stiff the panels are. This is before ironing and clipping the seam allowances.

Corset pattern sewn but not ironed
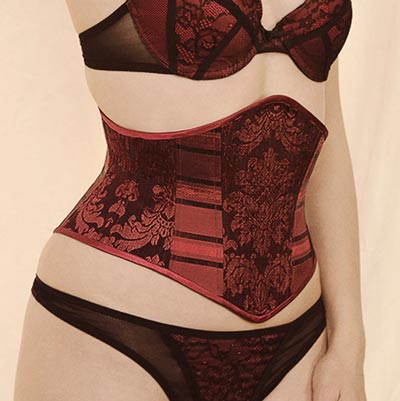
Here it is on after a good iron and the steel boning added. I believe the gamble on mixing these two strongly patterned fabrics has paid off. I have since added the binding. I will remember to take a photo for tomorrows blog post.

Ironed and tried on
Finally a quick look at the third corset pattern, the advanced one! As it’s for Valentines Day it was suggested that I have a go at patterning the Kops Heart corset; a 1906 corset patent registered by Daniel Kops but as far as I know never made into a real corset. Various attempts to pattern it have been made from the drawing that you can see in the bottom left of the photo below and some truly beautiful corsets have come out of it so I took up the challenge and my word I’m glad I invested in some proper draping tape! There are -a lot- of bone channels and some very tricky lines to recreate. I’ll share the process in full tomorrow and show you how the corset making is coming along.

Drafting the Kops heart corset pattern

wow..Scarlett this is awesome! I do have a question regarding the heat and bond… I’ve known others to fuse a yard of fabric, then cut the pattern.. but I have never had success. I will get puckering and wrinkling.. by any chance did you cut the pattern from the heat and bond 1st then fuse the small piece to your pattern cut fabric piece.. it seems like more work, but more manageable.. Yes? no?
Yes that’s exactly what I did. Didn’t want to waste any heat and bond so I used the pattern pieces to cut it out before fusing it to the also already cut fabric pieces – make sure you cut the heat and bond with the pattern pieces the right way round so the glue goes against the back of the fabric pieces you’re fusing first.